
A Beginner's Guide to DIY Injection Molding at Home

DIY injection molding lets you bring your creative ideas to life by crafting custom plastic parts right at home. It’s a hands-on process where you design and produce items tailored to your needs. Whether you’re making an injection moulded part for a hobby project or a practical household item, this method gives you control over the design and material. Plus, it’s a cost-effective way to experiment with manufacturing techniques without relying on industrial setups. With the right tools and a bit of practice, you can turn your concepts into tangible, functional pieces.
Key Takeaways
- DIY injection molding empowers you to create custom plastic parts at home, saving money and enhancing your creativity.
- Start with simple designs and gradually experiment with more complex molds as you gain confidence and skills.
- Invest in essential tools like an injection molding machine, molds, and heating sources to ensure quality results.
- Use high-quality materials, such as polypropylene or specialty plastics, to improve the durability and appearance of your parts.
- Follow safety precautions, including wearing protective gear and ensuring proper ventilation, to create a safe working environment.
- Post-processing techniques like trimming, sanding, and polishing can significantly enhance the final look and functionality of your parts.
- Consider combining DIY techniques with professional services for high-precision results, especially for complex designs or larger production runs.
Understanding Injection Molding Basics
What is Injection Molding?
Injection molding is a manufacturing process that helps you create plastic parts by injecting molten material into a mold. It’s like pouring batter into a cake mold, but instead of cake, you get durable plastic parts. This method is widely used in industries to produce everything from toys to automotive components. For DIY enthusiasts, it opens up endless possibilities to craft custom items at home.
The process starts with designing a mold, which shapes the final product. You then heat the plastic until it melts and inject it into the mold. Once it cools, you remove the solidified part. This simple yet effective technique allows you to make precise and functional items, including injection moulded parts, without needing expensive industrial equipment.
Benefits of DIY Injection Molding
Why should you try DIY injection molding? The benefits are plenty:
- Cost-Effective: You save money by creating parts yourself instead of buying them or outsourcing production.
- Customization: You can design molds to fit your exact needs, whether for a hobby project or a household repair.
- Skill Development: Learning this process enhances your technical skills and gives you hands-on experience with manufacturing techniques.
- Creative Freedom: You’re not limited by what’s available in stores. You can bring your unique ideas to life.
For example, if you need a specific part for a DIY gadget or a replacement piece for a broken item, DIY injection molding lets you make it yourself. It’s empowering and practical.
Comparing DIY and Professional Injection Molding
DIY injection molding and professional services each have their strengths. Understanding the differences helps you decide which suits your needs.
DIY Injection Molding: Perfect for small-scale projects and personal use. It’s budget-friendly and gives you control over the process. You can experiment with designs and materials without committing to large production runs. For instance, using a DIY setup, you could create an injection moulded part for a prototype or a one-off project.
Professional Injection Molding: Ideal for high-volume production and complex designs. Professionals use advanced machinery to ensure precision and consistency. If you need intricate parts or large quantities, professional services are the way to go.
For high-quality professional results, consider services like the Precise PP Plastic Mould Custom Plastic Parts Product Double Injection Molding Service in Shanghai. This service offers high-precision manufacturing with durable PP plastic material. Check out the product image below for a closer look:
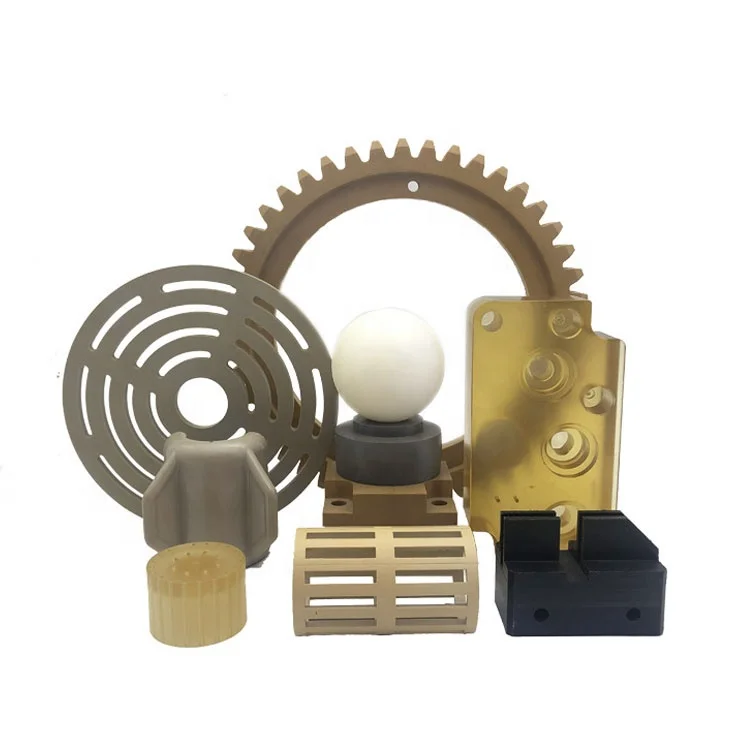
Another excellent option is the High Precision OEM Injection Molding Customized PPS GF40 Plastic Injection Part. This service specializes in durable and customizable parts tailored to your specifications. Here’s an image of the product:

By combining DIY techniques with professional services, you can achieve the best of both worlds. Start small with DIY projects and scale up when needed.
Tools, Materials, and Equipment for DIY Injection Molding
Essential Tools and Equipment
To get started with DIY injection molding, you need a few key tools and pieces of equipment. These items form the backbone of your setup and ensure you can create high-quality injection moulded parts at home.
- Injection Molding Machine: This is the heart of the process. You can either purchase a small manual machine or build one yourself using online guides. A simple machine works well for beginners.
- Mold: The mold shapes your final product. You can make molds from metal, silicone, or even 3D-printed materials. Choose a material that suits your project’s complexity and durability needs.
- Heating Source: You’ll need a reliable way to melt the plastic. Many DIYers use a heat gun, toaster oven, or even a stovetop for this purpose.
- Injection Tool: This tool helps you inject the molten plastic into the mold. A syringe or a plunger-style injector works for small-scale projects.
- Clamps: These hold the mold securely during the injection process. Strong clamps prevent leaks and ensure the plastic fills the mold evenly.
Having these essentials ensures you’re ready to start crafting your own injection moulded parts.
Materials for DIY Injection Molding
The materials you choose play a big role in the quality and durability of your finished parts. Here are some common options:
- Plastic Pellets: These are the raw materials for your parts. Popular choices include polypropylene (PP), polyethylene (PE), and polystyrene (PS). Each type has unique properties, so pick one based on your project’s requirements.
- Recycled Plastic: For an eco-friendly option, you can use recycled plastic from old containers or household items. Just make sure to clean and shred it before use.
- Specialty Plastics: If you need parts with specific characteristics, consider specialty plastics like PPS GF40. These materials offer enhanced strength and heat resistance, making them ideal for demanding applications.
For professional-grade results, explore services like the Precise PP Plastic Mould Custom Plastic Parts Product Double Injection Molding Service in Shanghai. This service uses high-precision manufacturing techniques and durable PP plastic material. Check out the product image below:
Another excellent option is the High Precision OEM Injection Molding Customized PPS GF40 Plastic Injection Part. This service specializes in creating durable and customizable parts. Here’s an image of the product:
Using high-quality materials ensures your injection moulded parts meet your expectations.
Optional Accessories for Enhanced Results
While the essentials get the job done, a few optional accessories can improve your results and make the process smoother:
- Digital Thermometer: This helps you monitor the plastic’s temperature to avoid overheating or underheating.
- Release Agent: A spray or liquid release agent makes it easier to remove the part from the mold without damage.
- Polishing Tools: These help you smooth out any imperfections on the finished part for a professional look.
- 3D Printer: If you want to experiment with custom mold designs, a 3D printer can be a game-changer.
Adding these accessories to your setup can elevate your DIY injection molding projects and help you achieve more polished and precise results.
Step-by-Step Guide to DIY Injection Molding
Designing and Creating the Mold
The mold is the foundation of your injection molding project. It determines the shape and details of your final product. Start by sketching your design on paper or using design software. Keep the geometry simple if you're a beginner. Avoid sharp corners or overly complex shapes, as these can make the molding process harder.
Once you finalize the design, choose a material for the mold. Metal molds are durable but require advanced tools to shape. Silicone molds are easier to work with and great for beginners. If you have access to a 3D printer, you can create molds using 3D-printed materials. Ensure the mold has proper exit angles to release the part smoothly after cooling.
After creating the mold, inspect it for imperfections. Any flaws in the mold will transfer to the injection moulded part. Sand down rough edges and test the mold with a small amount of material to ensure it works as expected.
Preparing the Material
The material you use plays a big role in the quality of your injection moulded part. Start by selecting plastic pellets that suit your project. Common options include polypropylene (PP) for flexibility or polystyrene (PS) for rigidity. If you're eco-conscious, consider using recycled plastic. Clean and shred it into small pieces before use.
Before heating the plastic, measure the amount you'll need. Too much material can overflow the mold, while too little may leave gaps in the part. Use a digital scale for accuracy. Place the plastic in your heating source, such as a heat gun or toaster oven. Monitor the temperature closely. Overheating can degrade the plastic, while underheating makes it hard to inject.
When the plastic reaches a molten state, stir it gently to remove air bubbles. Air pockets can weaken the final part. Once the material is ready, act quickly to avoid it cooling before injection.
Operating the Injection Molding Machine
Now comes the exciting part—creating your injection moulded part. Secure the mold in place using clamps. This prevents leaks and ensures the plastic fills the mold evenly. Double-check that the mold is aligned properly.
Load the molten plastic into your injection tool, such as a syringe or plunger-style injector. Inject the plastic into the mold steadily. Avoid rushing, as this can cause uneven filling. Watch for any signs of overflow and stop injecting once the mold is full.
Allow the plastic to cool and solidify. The cooling time depends on the material and the size of the part. Once cooled, carefully open the mold and remove the part. If the part sticks, use a release agent or gently tap the mold to loosen it.
Inspect the finished part for defects. If you notice issues like air bubbles or incomplete filling, adjust your process and try again. With practice, you'll refine your technique and produce high-quality parts.
For professional-grade results, consider services like the Precise PP Plastic Mould Custom Plastic Parts Product Double Injection Molding Service in Shanghai. This service offers high-precision manufacturing with durable PP plastic material. Here's an example of their work:
Another excellent option is the High Precision OEM Injection Molding Customized PPS GF40 Plastic Injection Part. This service specializes in durable and customizable parts tailored to your needs. Check out their product below:
Combining DIY techniques with professional services can help you achieve exceptional results for more complex projects.
Post-Processing the Injection Moulded Part
Once you’ve removed your injection moulded part from the mold, the work isn’t quite done yet. Post-processing ensures your part looks polished and functions as intended. This step refines the final product and addresses any imperfections left during the molding process.
1. Trimming Excess Material
Start by inspecting your part for any excess plastic, often called “flash.” Flash occurs when molten plastic seeps out of the mold’s edges. Use a sharp utility knife or small scissors to carefully trim away these unwanted bits. Work slowly to avoid damaging the part. For thicker flash, sandpaper or a file can help smooth the edges.
2. Sanding and Smoothing
After trimming, check the surface of your part. If it feels rough or uneven, sanding can improve its texture. Begin with coarse-grit sandpaper to remove larger imperfections, then switch to finer grits for a smoother finish. Sand in a circular motion to avoid leaving scratches. This step is especially important if your part will be visible or needs to fit precisely with other components.
3. Polishing for a Professional Finish
If you want your part to have a glossy or professional appearance, polishing is the next step. Use a soft cloth and a plastic polish compound to buff the surface. Apply the polish in small amounts and rub in circular motions. This process enhances the look of your part and removes any remaining fine scratches.
4. Painting or Coating (Optional)
For parts that need a specific color or additional protection, consider painting or applying a coating. Choose a paint designed for plastics to ensure proper adhesion. Clean the part thoroughly before painting to remove dust or oils. Apply thin, even coats and let each layer dry completely before adding the next. A clear protective coating can also add durability and a polished finish.
5. Testing and Adjustments
Finally, test your part to ensure it meets your expectations. Check its fit, functionality, and durability. If something doesn’t feel right, identify the issue and make adjustments. For example, if the part doesn’t fit properly, you might need to sand it further or modify the mold for future attempts.
For high-quality results, you can also explore professional services like the Precise PP Plastic Mould Custom Plastic Parts Product Double Injection Molding Service in Shanghai. This service offers precise manufacturing with durable PP plastic material. Here’s an example of their work:
Another excellent option is the High Precision OEM Injection Molding Customized PPS GF40 Plastic Injection Part, which specializes in durable and customizable parts. Check out their product below:
By combining DIY post-processing techniques with professional-grade services, you can achieve exceptional results for your injection moulded part. Whether you’re refining a simple prototype or creating a polished final product, post-processing is a crucial step in the journey.
Safety Considerations and Best Practices
Safety Tips for DIY Injection Molding
When working with DIY injection molding, safety should always come first. The process involves high temperatures, sharp tools, and potentially hazardous materials. Following these tips will help you stay safe while creating your injection moulded parts.
- Wear Protective Gear: Always wear heat-resistant gloves to protect your hands from burns. Safety goggles shield your eyes from molten plastic or debris. A long-sleeved shirt and closed-toe shoes add an extra layer of protection.
- Ensure Proper Ventilation: Melting plastic can release fumes that may be harmful if inhaled. Work in a well-ventilated area or use an exhaust fan to keep the air clean.
- Handle Tools Carefully: Use sharp tools like knives and scissors with caution. Always cut away from your body to avoid injuries. Keep your workspace organized to prevent accidents.
- Monitor Temperatures Closely: Overheating plastic can cause it to degrade and release toxic fumes. Use a digital thermometer to maintain the correct temperature and avoid overheating.
- Secure Your Mold: Clamps keep the mold in place during the injection process. Loose molds can cause leaks or spills, which may lead to burns or wasted material.
- Keep a Fire Extinguisher Nearby: Working with heat sources always carries a risk of fire. Having a fire extinguisher within reach ensures you’re prepared for emergencies.
By following these safety measures, you can enjoy the creative process without unnecessary risks.
Best Practices for Successful Results
Creating high-quality injection moulded parts requires more than just the right tools and materials. Adopting best practices ensures your projects turn out as planned and helps you improve your skills over time.
- Start Simple: If you’re new to DIY injection molding, begin with basic designs. Simple shapes are easier to mold and help you learn the process without frustration.
- Test Your Mold: Before injecting plastic, test your mold with a small amount of material. This step helps you identify flaws or misalignments that could affect the final part.
- Use High-Quality Materials: The quality of your plastic directly impacts the durability and appearance of your parts. For professional-grade results, consider services like the Precise PP Plastic Mould Custom Plastic Parts Product Double Injection Molding Service in Shanghai. This service uses high-precision manufacturing techniques and durable PP plastic material. Here’s an example of their work:
Another excellent option is the High Precision OEM Injection Molding Customized PPS GF40 Plastic Injection Part, which specializes in durable and customizable parts. Check out their product below:
- Work Steadily: Inject the molten plastic into the mold at a steady pace. Rushing can cause uneven filling or air bubbles, which weaken the part.
- Inspect and Adjust: After removing the part from the mold, inspect it for defects. If you notice issues like incomplete filling or rough edges, adjust your process and try again.
- Keep Learning: DIY injection molding is a skill that improves with practice. Experiment with different materials, designs, and techniques to expand your capabilities.
By combining these best practices with your creativity, you’ll produce injection moulded parts that meet your expectations. Whether you’re crafting a prototype or a functional item, these tips will set you up for success.
Troubleshooting and Improving Results
Common Issues in DIY Injection Molding
When you’re working on DIY injection molding, things don’t always go as planned. But don’t worry—most problems have simple solutions. Here are some common issues you might face and how to fix them.
Incomplete Filling of the Mold
If your injection moulded part comes out with missing sections or gaps, the plastic likely didn’t fill the mold completely. This can happen if the plastic cools too quickly or if there isn’t enough pressure during injection. To fix this, try increasing the temperature of the plastic or injecting it more steadily. Also, make sure the mold is properly clamped to prevent leaks.Air Bubbles in the Part
Air bubbles can weaken your part and ruin its appearance. These bubbles usually form when air gets trapped in the molten plastic. To avoid this, stir the plastic gently before injecting it into the mold. You can also add small vents to your mold to let trapped air escape.Warping or Deformation
Warping happens when the part cools unevenly, causing it to bend or twist. This issue often occurs if the mold isn’t evenly heated or if the cooling process is rushed. To prevent warping, let the part cool naturally and avoid removing it from the mold too soon.Rough or Uneven Surface
If your injection moulded part has a rough texture, the mold surface might not be smooth enough. Sand and polish the mold to improve the finish of your parts. Using a release agent can also help the part come out cleaner.Flash (Excess Plastic Around the Edges)
Flash occurs when molten plastic seeps out of the mold’s edges. This usually means the mold isn’t sealed tightly. Check your clamps and make sure the mold halves fit together perfectly. Trimming the flash with a utility knife or sandpaper can clean up the part.
For professional-grade results, consider services like the Precise PP Plastic Mould Custom Plastic Parts Product Double Injection Molding Service in Shanghai. This service ensures high precision and uses durable PP plastic material. Here’s an example of their work:
Another great option is the High Precision OEM Injection Molding Customized PPS GF40 Plastic Injection Part, which specializes in creating durable and customizable parts. Check out their product below:
Tips for Better Results
Improving your DIY injection molding skills takes practice and a few smart strategies. Follow these tips to create better injection moulded parts every time.
Perfect Your Mold Design
A well-designed mold is the key to success. Keep your designs simple, especially if you’re just starting out. Avoid sharp corners and complex shapes that can make the molding process harder. Test your mold with a small amount of material before committing to a full run.Use High-Quality Materials
The quality of your plastic affects the durability and appearance of your parts. Choose materials like polypropylene (PP) or specialty plastics like PPS GF40 for demanding applications. Recycled plastic can work too, but make sure it’s clean and properly shredded.Monitor Temperature Closely
Heating the plastic to the right temperature is crucial. Use a digital thermometer to avoid overheating or underheating. Proper temperature control ensures the plastic flows smoothly and fills the mold completely.Inject Steadily and Evenly
Rushing the injection process can lead to air bubbles or uneven filling. Inject the molten plastic at a steady pace and watch for signs of overflow. Practice makes perfect, so don’t get discouraged if it takes a few tries to get it right.Polish and Finish Your Parts
Post-processing can make a big difference in the final look of your parts. Trim excess material, sand rough edges, and polish the surface for a professional finish. If needed, paint or coat the part to enhance its appearance and durability.Learn from Each Project
Every project teaches you something new. Take notes on what worked and what didn’t. Adjust your techniques and materials based on your results. Over time, you’ll develop the skills to tackle more complex designs and achieve consistent success.
By following these tips and addressing common issues, you’ll improve your DIY injection molding projects and create high-quality parts. Whether you’re crafting a prototype or a functional item, the process becomes more rewarding as you refine your skills.
Exploring Professional Injection Molding Services
When to Consider Professional Services
Sometimes, DIY injection molding might not meet all your needs. You may want to consider professional services when your project requires high precision, complex designs, or large production volumes. Professionals use advanced machinery and techniques to deliver consistent results. If you’re working on an intricate injection moulded part or need a batch of identical pieces, professional services can save you time and effort.
Professional services also come in handy when you need parts made from specialty materials. For example, if your project demands enhanced durability or heat resistance, professionals can work with materials like PPS GF40. They ensure the final product meets your exact specifications.
One excellent option is the Precise PP Plastic Mould Custom Plastic Parts Product Double Injection Molding Service in Shanghai. This service specializes in high-precision manufacturing using durable PP plastic material. Here’s an example of their work:
Another great choice is the High Precision OEM Injection Molding Customized PPS GF40 Plastic Injection Part. This service focuses on creating durable and customizable parts tailored to your needs. Check out their product below:
When you need professional-grade results, these services provide the expertise and tools to bring your vision to life.
Combining DIY and Professional Techniques
You don’t have to choose between DIY and professional injection molding. Combining both approaches can give you the best of both worlds. Start with DIY techniques for small-scale projects or prototypes. This lets you experiment with designs and materials without a big investment. Once you finalize your design, you can scale up production with professional services.
For example, you could create a prototype of an injection moulded part using your DIY setup. Test its functionality and make adjustments as needed. When you’re satisfied with the design, hand it over to a professional service for mass production. This approach saves money and ensures your final product meets high-quality standards.
Professional services can also complement your DIY efforts by providing access to advanced materials and techniques. If you need a part made from PPS GF40 or require double injection molding, professionals can handle these tasks with precision. By blending DIY creativity with professional expertise, you can tackle projects of any size or complexity.
Services like the Precise PP Plastic Mould Custom Plastic Parts Product Double Injection Molding Service in Shanghai and the High Precision OEM Injection Molding Customized PPS GF40 Plastic Injection Part are perfect for this purpose. They offer high-quality results that align with your DIY efforts.
DIY injection molding gives you the power to create custom plastic parts right at home. You’ve learned how to design molds, prepare materials, and craft an injection moulded part with simple tools. This process not only saves money but also boosts your creativity and technical skills. Start small with basic projects to build confidence. As you grow, explore professional-grade techniques and advanced materials for more complex designs. Whether you stick with DIY or combine it with professional services, the possibilities are endless. So, why wait? Dive in and bring your ideas to life today!